
To transfer iPhone photos to external hard drive on Windows and Mac can pose various issues for users. The main problem is the limited space on iPhones, which leads to a constant need for solutions to storing photos. Moreover, dealing with the file systems on Windows and Mac can be confusing due to their complexity. However, solving these challenges involves using the best methods for a smooth photo transfer.
Read this article to learn the best app to transfer photos from iPhone to PC, MobileTrans, to transfer and safeguard iPhone data on an external device. It securely backs up contacts, photos, videos, and music without the internet. Additionally, we’ll discover built-in tools for Windows and Mac users to simplify the process.
Part 1: One-Click Tool to Transfer Photos from iPhone to External Hard Drive
MobileTrans stands out as the ideal app for transferring iPhone photos to Windows 11 and other versions. Operating rapidly, it moves various data types between systems from Android to iPhone or vice versa. Moreover, it excels in backing up and restoring data between phones, including transferring iPhone photos to an external hard drive.
Additionally, it simplifies transferring photos, music, and files between phone and computer. This phone transfer app allows batch transfer and supports the transition from Android to iPhone or Android to Android. Furthermore, it allows transferring data to any device without overwriting existing information.
Key Features
- MobileTrans provides a one-click solution for transferring content from your old phone to a new one. You don’t need to go through the tedious steps of other transfer tools like Smart Switch or Move to iOS app.
- Users can experience significantly faster data transmission with MobileTrans than with Bluetooth or app-based transfers.
- It ensures a smooth transfer of your iCloud data to your new Android device. Users can enjoy secure and flexible data transfers without fearing losing valuable content.
Simplified Instructions to Move Photos from iPhone to External Hard Drive
Wondershare MobileTrans can smoothly move photos from an iPhone to an external hard drive to clear space. Follow the steps below to quickly transfer your pictures for convenient access and long-term protection.
Step 1. Connect Your iPhone to Computer and Open MobileTrans
Begin the photo transfer process by launching MobileTrans on your computer. Once the program is running, select the “File transfer” option and choose “Export to Computer.” This will establish a connection between your iPhone and the computer for effortless data transfer.
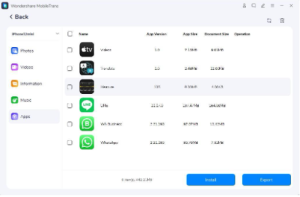
Step 2: Choose Photos as the File Type to Transfer
After your iPhone is connected, it will automatically load all the supported file types. Select the “Photos” option from the left toolbar to specifically transfer photos. Afterward, press the “Export” button to initiate the transfer process.
Step 3: Completion of Photo Transfer Process
Users should maintain a connection between the iPhone and the computer until the transfer is complete. Once the transfer is complete, click the “Open Folder” button to access the folder with exported photos. Link your external drive and computer by plugging in it. Then, copy the required photos, access your external hard drive, and paste them there.
Part 2: 2 Methods for Windows to Transfer Photos from iPhone to External Hard Drive
Let’s understand why it’s essential to move your iPhone photos to an external hard drive using Windows. This helps in keeping your special memories safe and offers a practical way to handle the limited storage. Plus, we have two reliable methods specifically designed for Windows users for convenient access. Let’s explore these two methods to make the transfer process straightforward.
Method 1: File Explorer
The familiar interface of File Explorer makes it easy for even those with basic computer skills to navigate. This method takes advantage of Windows’ built-in features to organize your iPhone photos. By following the steps of using File Explorer to transfer the photos simplifies the process of moving images.
Step 1: To begin, link your iPhone and the external hard drive to your PC. Make sure the computer has recognized the device. Now, open File Explorer using the “Win + E” keys and head to “This PC.” Afterward, pick your “Apple iPhone” to access iPhone photos categorized into date-based subfolders.
Step 2: Then, pick photos, whether individual pictures or entire folders, for the transfer process. After making your selection, “Copy” those selected photos or folders after right-clicking them. Next, go to your external hard drive and choose “Paste” on the preferred destination. This step effectively transfers photos from your iPhone to an external hard drive connected to your PC.
Method 2: Windows Photos App
Photos App offers a straightforward interface, perfect for those who like integrated solutions. Alternatively, users can use the best app to transfer photos from iPhone to PC. Now, let’s explore the method with the Windows Photos App to make the process convenient for you.
Step 1: You can start the process by connecting your iPhone and external hard drive to your computer with a USB. Next, establish trust between the iPhone and the external device by following on-screen instructions. Now, open the “Photos” application on your computer to initiate a new window. On this screen, select the “Import” button at the top and select “Apple iPhone” to begin the smooth transfer process.
Step 2: Once the photos have loaded, select the ones you want and click the “Add” button. Next, a small window will appear, giving you the option to choose an existing folder or create a new one for importing the selected photos.
Step 3: After successfully importing images, locate the folder in the left panel. Now, tap “Right-click” to open an extended menu and choose the “Open in File Explorer” option.
Step 4: Next, a small window will appear that allows you to copy the selected photos. Following this, find your external hard drive showing on the computer and “Paste” the chosen images into it.
Part 3: 2 Methods for Mac to Transfer Photos from iPhone to External Hard Drive
In addition to utilizing iPhone transfer software or iCloud, Mac users can consider two alternative solutions. These methods can efficiently transfer iPhone photos to the external hard drive. Additionally, they provide flexibility and diverse approaches to meet varying user preferences and needs.
Method 1: Image Capture
Image Capture, a Mac program, allows users to capture and import photos from digital cameras. Also, Apple users can transport data from iOS and other devices equipped with a camera. The detailed method to move iPhone photos to an external device is mentioned below.
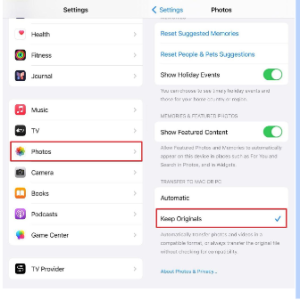
Step 1: Start by accessing your iPhone’s “Settings,” then scroll down to locate the “Photos” option. Once selected, scroll to the bottom to find and choose the “Transfer to Mac or PC” section. Ensure the “Keep Originals” option is checked if not automatically selected.
Step 2: Next, connect your iPhone to the computer using the iPhone cable. Then, a prompt will appear on your iPhone that requests your permission. Tap “Trust” to allow the computer to access data from the iPhone, and enter your passcode for confirmation.
Step 2: Afterward, open the pre-installed software Image Capture on your Mac. The software will start loading all the photos and videos and choose specific photos to import. However, users can select multiple pictures by holding the “Command” key. In the end, click the “Download” or “Download All” button to import photos to your Mac and then drag, drop, or copy-paste them to the external drive.
Method 2: Photos App
Photos App on Mac provides another avenue for users to transfer iPhone photos to external hard drives. The user-friendly interface of the Photos App for Mac offers simplicity and makes the process accessible for users. Now, let’s explore this method further to understand how it can be utilized effectively.
Step 1: To initiate, connect your iPhone to your Mac and open the “Photos” app. Now, you’ll see your phone under the “Device” section in the left sidebar. So, click on your “iPhone” to access its content and select the photos you want to transfer. After that, click on the “Import Selected” or “Import All New Photos” button to transfer the images to your Mac.
Step 2: Now, the photos will be available in your Mac “Imports” that you copy using “Command+C” and paste using “Command+V” to your external hard drive easily.
Conclusion
Although Windows and Mac have their built-in methods, Wondershare MobileTrans shines as an outstanding solution. Its versatility and user-friendly design make the photo transfer a one-click process. Additionally, rapid data transfer and robust data protection guarantee a smooth experience for Windows and Mac users. So, download this innovative tool to move photos from the iPhone to the external hard drive efficiently.